So, this article will talk about the differences between an Aeropress vs French Press. Both devices are popular in the World of Coffee and while they both yield a delicious cup of coffee, there are some differences between them. So, by learning about these two in the article, you will find out which one is actually the brewer you prefer to use at home.
Along the way, you might also would like to read something about Chemex vs AeroPress, which is again a comparison people mostly look for.
When it comes down to their main difference, one can say that the Aeropress has a much shorter brew time than the French press. What’s interesting is that they are both based on the concept of immersion and pressure. This means that all the coffee grounds are immersed underwater and then pressure is applied to reach the final result. However, despite their similarities, the flavor profile of your coffee will be totally different.
In the following sections, we will learn about the brief history of the French Press and the Aeropress, we will compare their brewing methods, find out what is the ideal grind setting to use and why, but also learn more about the flavor profile and their price in the market. By comparing these two brewing methods it is our goal to show you the best way to use them in order to make your coffee as delicious as possible. Then, it is up to you to decide which one you prefer.
History – Aeropress vs French Press
A Brief History About French Press
When we talk about history, we always talk about dates. In order to walk you through the history of the French Press and the Aeropress, I have to start with which one was invented first. You have probably already guessed that the one invented first was the french press. The french press dates back to 1852 when two French men, Mayer and Delforge, came up with its patent. This is also where it takes its name, although you might encounter it in a few places with a different name such as the Plunger, the Chambord, the Press Pot, or the Cafetiére.

The version of the French Press that was patented by Mayer and Delforge, did not have a seal. The seal was added later on in 1929 by two Italians this time, Calimani and Moneta. The reason they added the seal was that it allowed for a more methodical pressing of the coffee grounds. Jump ahead a few years and we reach the year 1958 when yet another Italian, Faliero Bondanini, created the most popular French press design to this day. He then sold his design to Bodum, a Danish corporation, which has been selling the french press since 1991 with great success. The design is being sold to this day.
A Brief History About AeroPress
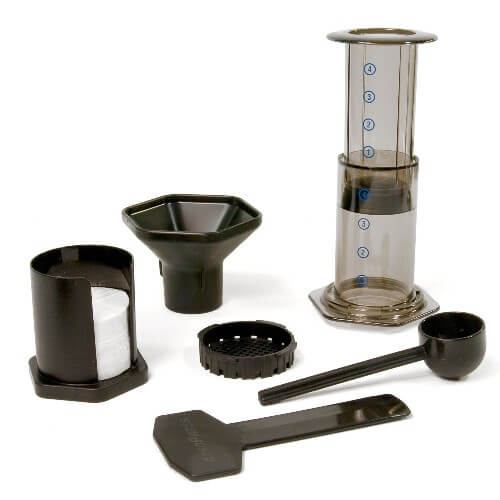
The Aeropress on the other hand was invented very recently, actually in 2005. Its inventor, Alan Adler, had nothing to do with the world of a coffee professional, he was just a coffee aficionado who wanted to find a way to make his coffee taste less bitter. In order to understand how it works, you need to know what it consists of. Basically, the Aeropress looks like a huge syringe. It consists of a plunger, a filter cap, and a chamber, all you need to add is the filters that are sold separately.
Alan came up with the idea when he realized that his brew tasted bitter because the brew time was too long. In order to reduce the overall brew time he engineered a device that would still use pressure but in a small closed chamber. By trapping the coffee grounds and the hot water in the chamber he increased the pressure and therefore was able to brew the coffee faster. In reality, the Aeropress is using the same technology that the espresso machine is using, only you don’t need electricity, just your hands. This makes it very popular among campers as well since it’s considered one of the best portable coffee brewing devices.

Brewing Guides – French Press vs Aeropress
Like we mentioned earlier, the primary element that makes these two brewing methods differ is the overall brew time. Of course, there are other variables at play, which we will explore below while we go through the way of brewing them both. Aspects that we will explore include, the coffee, water ratio, the grind setting, the water temperature and quantity, and the amount of coffee each one of them yields. In the end, we should be able to differentiate between their flavor profiles.
French Press Brewing Guide
The regular French press will give you about 3 cups of coffee by using a coffee to water ratio of 1:16. This means that you need to use 27 g of coffee for 430 ml of water. When you start heating your water, you have to add some extra water so you can preheat your French press and your coffee cup. The reason you do this is that the coffee won’t start losing its temperature too quickly by coming in contact with a cold surface. After you preheat your French press and cup, measure 27 g of coffee beans.
For the next step, you need your grinder. Make sure to grind your beans using a coarse grind setting. If you are wondering why you need your coffee grounds to be coarser, it’s because the French press has a long brewing time. When you immerse the grounds under the hot water they will sit there for a bit and start extracting for longer. You want to avoid over-extraction so by making them coarser and more flat you are slowing things down. Otherwise, your coffee will taste very bitter.
Once you’re done grinding your coffee beans, put them inside the French press you have preheated and make sure they are even. At this point, you will need your timer and hot water. Pour about half the quantity of the 430 ml of water and make sure to cover all the coffee grounds. If you wish, after about half a minute you can use a spoon or stirrer to mix them all under the water.
Then, you can put in the rest of the water and put the French press lid on top. Don’t push it down just yet, you need to leave it to brew until your timer says 4 minutes. When you finally reach that point, press down the lid of the French press and serve your coffee immediately. It is not advised to leave the coffee in the French press for a long time because it will over-extract and become very bitter. If you don’t wish to drink it all immediately then transfer it to another hot pot where the grounds won’t be in contact with the hot water anymore. Read our step by step guide about brewing with French press, as it better explains the process.
Aeropress Brewing Guide
The Aeropress has a reputation for being one of the most versatile brewing devices invented. This is because there are many variables that can be changed when you are brewing with it and will result in a different flavor profile. For the purpose of this article, we will see how we can use the Aeropress to make a clean cup that will bring out the best flavors of your coffee beans. Up until now, the Aeropress comes in one size and you can use it to make one cup of coffee.
First, you need to preheat the Aeropress, your cup, and the paper filter you are using. Then measure 17 g of coffee beans and grind them using a medium to fine grind setting. The reason you do this is that in order to brew a clean and bright cup of coffee the brew time must be short and a medium to fine grind setting extracts the coffee’s flavors faster than a coarser one. Moving on, insert the paper filter in the filter cup and place it inside the top of the AeroPress chamber.
Take the Aeropress plunger and place it inside the top of the chamber. At this point, you need to invert your Aeropress so that the plunger is on the bottom and the chamber is on the top. Add your ground coffee in the chamber and place the Aeropress on your scale. Start your timer and begin adding hot water, aiming for 250ml. Stir the coffee grounds to create some agitation in order for all the grounds to come in contact with the water for a better extraction.
Once you have reached the 250 ml of hot water, place your filter in the filter cap and rinse it with hot water. Then, attach it to the Aeropress chamber and flip it onto your cup. Plunge down at a slow pace, about 20 seconds, and stop when you hear the hissing sound. That hissing sound is the last remaining natural oils of the coffee, which we recommend you don’t add to your cup if you want a clear coffee with bright acidity and fruity flavors. Again, we have a step by step brewing guide about Aeropress, if you are in love with it!
Additional Brewing Tips
- Aeropress Filters – There are two types of filters you can buy to accompany your Aeropress, paper, and metal. If you desire to brew your Aeropress for a clean cup then use paper filters. But if you want your coffee to have more body, metal is the way to go. This is why the French press filter is also made of metal because the paper has the ability to absorb all the oils but metal doesn’t and it’s these oils that create the body.
- Water temperature – When it comes down to water temperature, we recommend that you brew your coffee between 91–96°C. It is a fact that the hotter you brew your coffee, the easier it is for coffee cells to breakdown. Once this happens all the flavor and the aroma will be released. However, feel free to experiment with the temperature if you wish to brew it lower than the above.
- Agitation – It is generally preferred that once you have added some hot water, you should stir the coffee-grounds with it. The reason for that is that if you agitate the coffee grounds you will extract your coffee more consistently. This is because you are making sure that all the grounds are mixed in the water. Again, feel free to experiment with the way you agitate the grounds.
Flavor Profiles – French Press vs Aeropress
Now you can see that both the Aeropress and French press are easy to use and both use the concepts of immersion and pressure. However, each one will result in a very different flavor and body. The French press will result in a rich and heavy cup of coffee with a lot of body and heavy mouthfeel. On the other hand, the Aeropress is more versatile. We recommend using an Aeropress to brew a clean and bright cup with fruity flavors. In contrast to the French press, your coffee will feel lighter in your mouth, almost like tea.
Final Thoughts
The aim of this article was to compare the French press with the Aeropress. Although similar in concept, these two brewing devices can result in a very different cup of coffee. As we mentioned above, the key difference lies in the overall brew time. There are of course other variables that will affect the brew, like the water temperature, the grind setting, the filters, and the agitation. If you are an espresso lover and don’t have an espresso machine, try these two to brew something close to espresso.
Now that you know all this, it’s time for you to experiment with these two brewing methods and decide which one is right for you. Happy brewing!


